你是否厌倦了 Jest 复杂的配置过程?每次在新项目中设置测试环境都要安装一堆依赖、配置 babel、处理 TypeScript 编译?Bun 3.0 带来的 Bun Test 测试框架,让这一切成为历史。
本教程将带你从零开始,使用 Bun Test 和快照测试(Snapshot Testing)构建一套完整的 TypeScript 单元测试工作流。无需额外配置,开箱即用,测试速度提升 10 倍以上。
为什么选择 Bun Test
环境准备
开始之前,确保你的开发环境满足以下要求:
安装 Bun 3.0
使用官方脚本一键安装:
# 安装 Bun
curl -fsSL https://bun.sh/install | bash

# 验证版本(确保 3.0+)
bun --version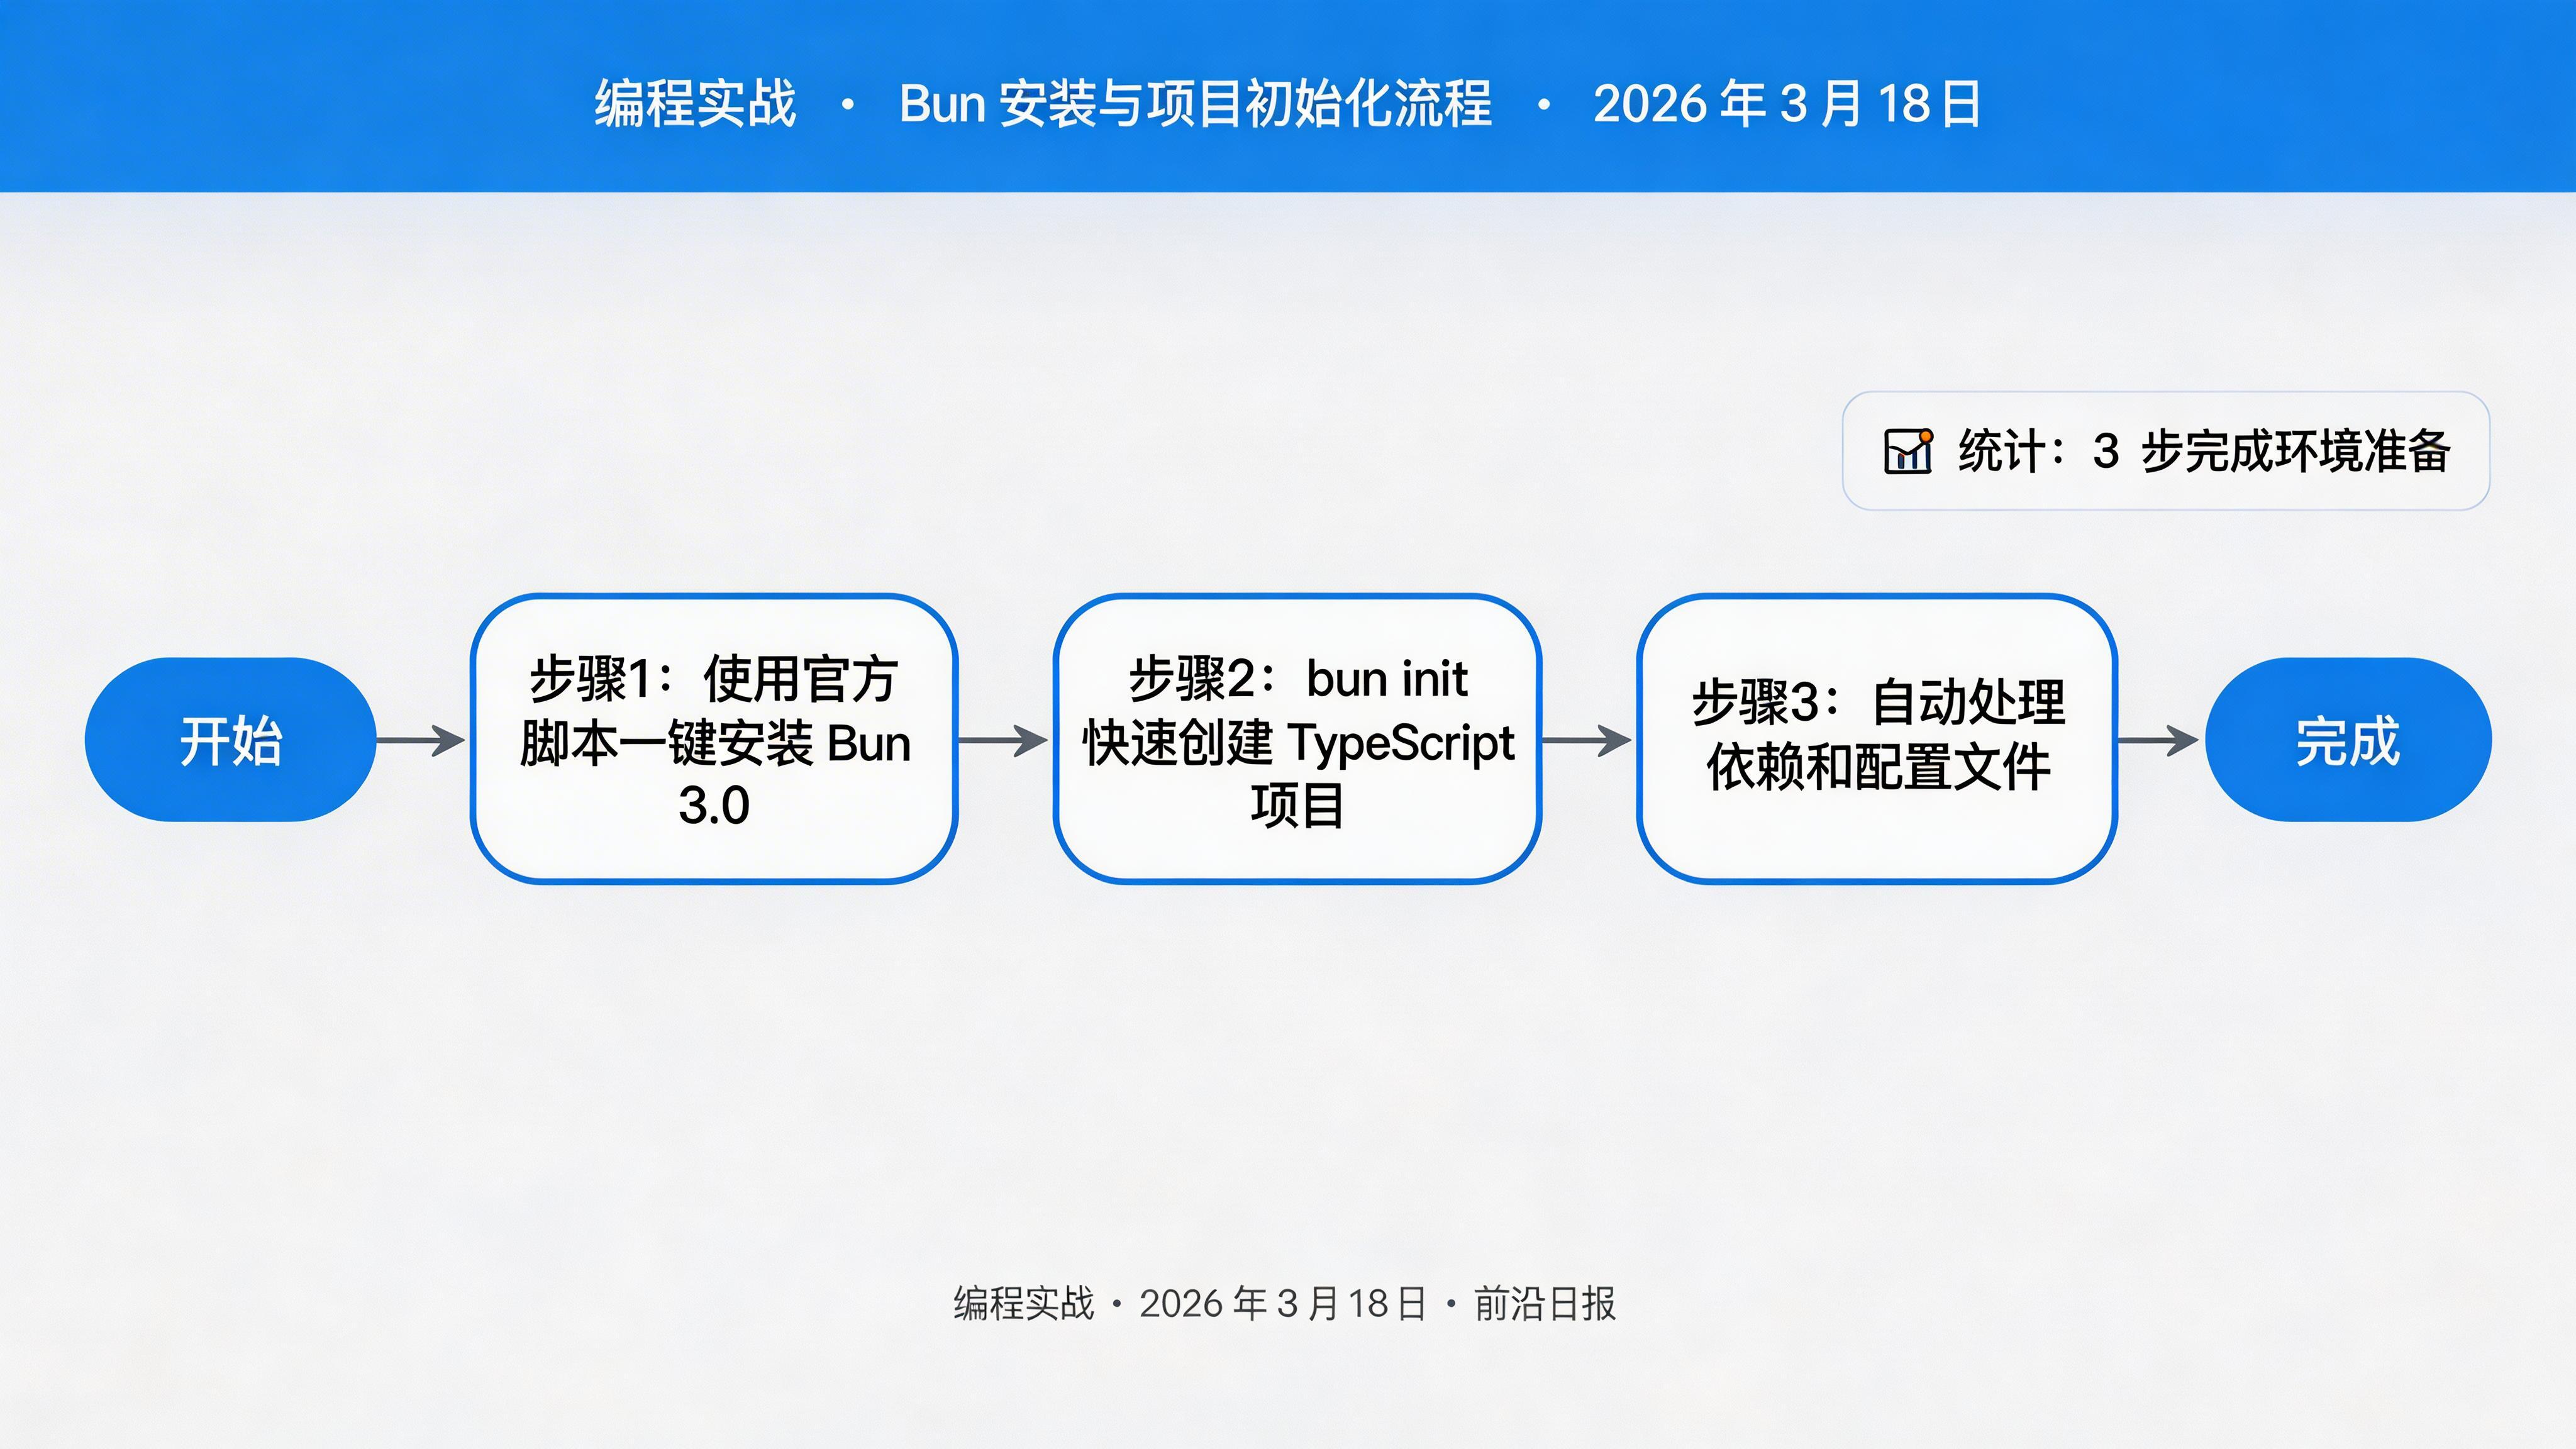
初始化项目
创建新的 TypeScript 项目:
# 创建项目目录
mkdir bun-test-demo && cd bun-test-demo

# 初始化项目
bun init

# 安装类型定义(可选,用于 Node.js API)
bun add -d @types/node
执行 bun init 后,你会得到以下文件结构:
bun-test-demo/
├── package.json
├── tsconfig.json
├── index.ts
└── README.md
实战步骤
创建被测试函数
在 src/utils/math.ts 中创建基础数学函数:
// src/utils/math.ts

export function add(a: number, b: number): number {
  return a + b;
}

export function subtract(a: number, b: number): number {
  return a - b;
}

export function multiply(a: number, b: number): number {
  return a * b;
}

export function divide(a: number, b: number): number {
  if (b === 0) {
    throw new Error("Division by zero");
  }
  return a / b;
}编写基础单元测试
创建测试文件 src/utils/math.test.ts:
// src/utils/math.test.ts
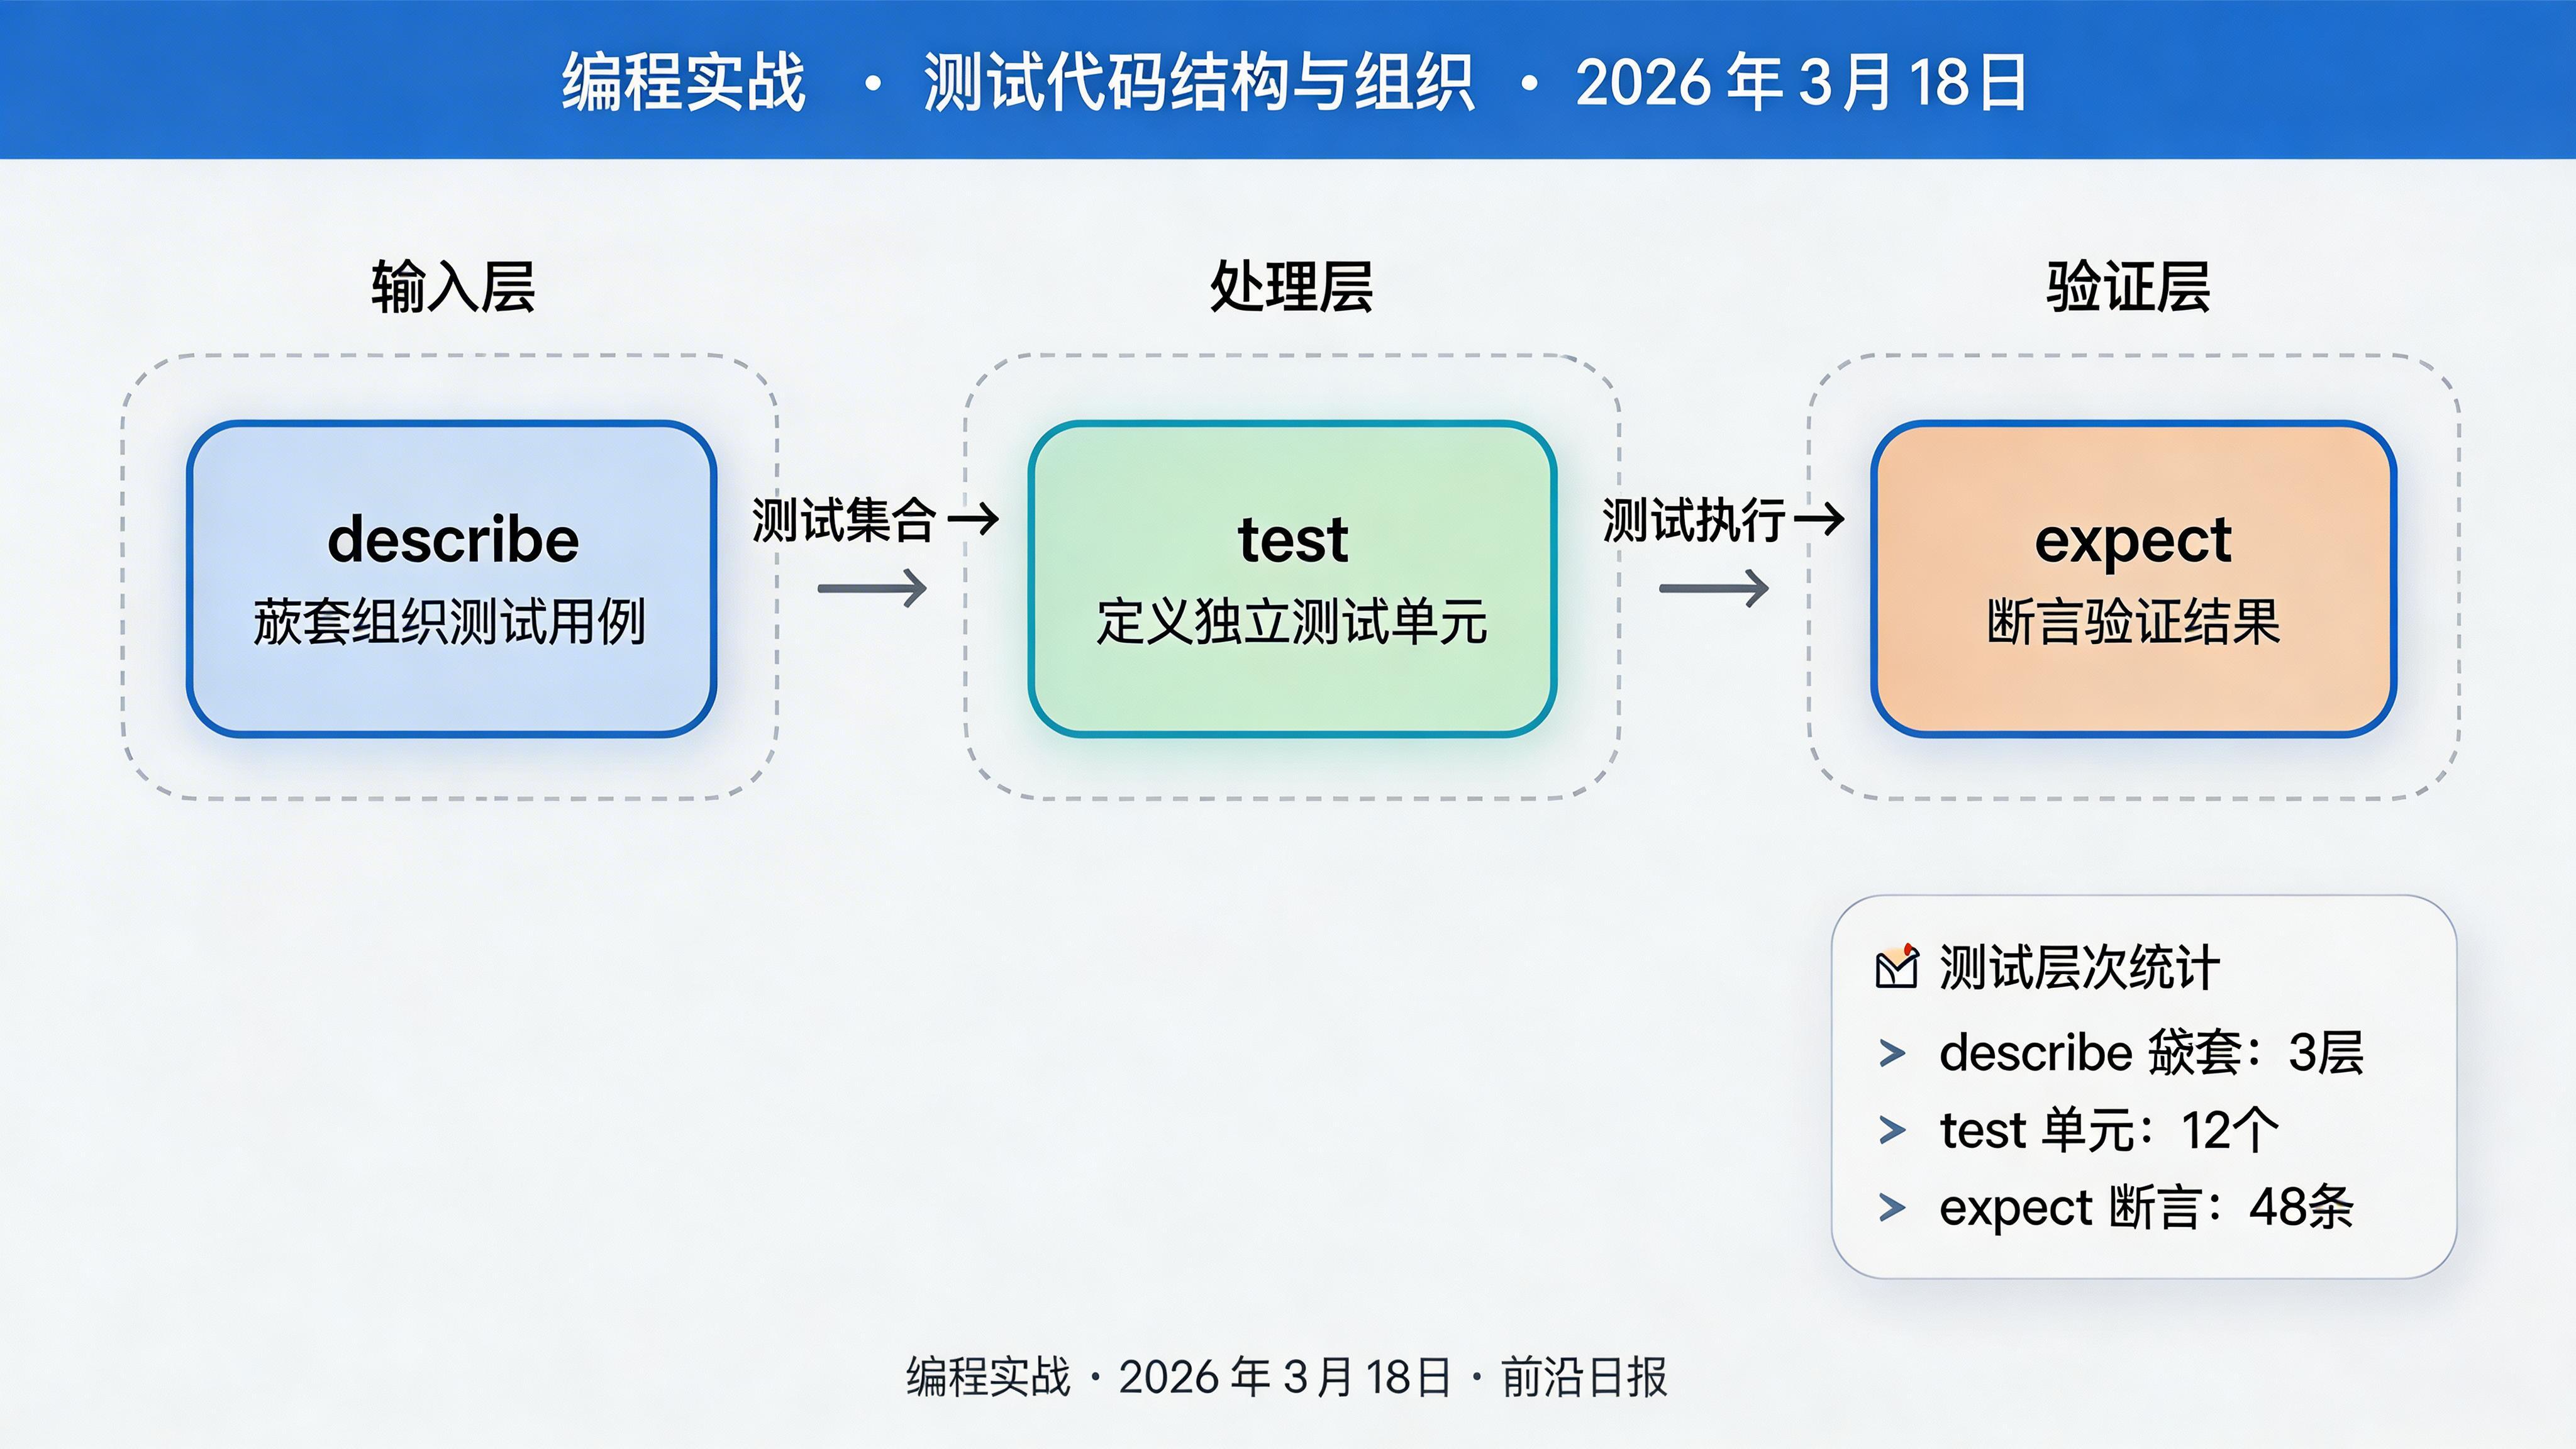
import { describe, expect, test } from "bun:test";
import { add, subtract, multiply, divide } from "./math";
describe("数学函数测试", () => {
describe("add 函数", () => {
test("两个正数相加", () => {
expect(add(1, 2)).toBe(3);
expect(add(10, 20)).toBe(30);
});
test("包含负数的加法", () => {
expect(add(-1, 1)).toBe(0);
expect(add(-5, -5)).toBe(-10);
});
test("浮点数加法", () => {
expect(add(0.1, 0.2)).toBeCloseTo(0.3);
});
});
describe("subtract 函数", () => {
test("两个正数相减", () => {
expect(subtract(5, 3)).toBe(2);
expect(subtract(10, 10)).toBe(0);
});
});
describe("multiply 函数", () => {
test("两个数相乘", () => {
expect(multiply(3, 4)).toBe(12);
expect(multiply(-2, 3)).toBe(-6);
});
});
describe("divide 函数", () => {
test("正常除法", () => {
expect(divide(10, 2)).toBe(5);
expect(divide(7, 2)).toBe(3.5);
});
test("除以零抛出错误", () => {
expect(() => divide(10, 0)).toThrow("Division by zero");
});
});
});
运行测试
使用 bun test 命令执行测试:
# 运行所有测试
bun test

# 运行特定文件
bun test src/utils/math.test.ts

# 带覆盖率报告
bun test --coverage
输出示例:
bun test v1.2.0

src/utils/math.test.ts:
(pass) 数学函数测试 > add 函数 > 两个正数相加 [0.12ms]
(pass) 数学函数测试 > add 函数 > 包含负数的加法 [0.05ms]
(pass) 数学函数测试 > add 函数 > 浮点数加法 [0.03ms]
(pass) 数学函数测试 > subtract 函数 > 两个正数相减 [0.02ms]
(pass) 数学函数测试 > multiply 函数 > 两个数相乘 [0.02ms]
(pass) 数学函数测试 > divide 函数 > 正常除法 [0.03ms]
(pass) 数学函数测试 > divide 函数 > 除以零抛出错误 [0.08ms]

 7 pass
 0 fail
 7 expect() calls
Ran 7 tests across 1 file. [12.00ms]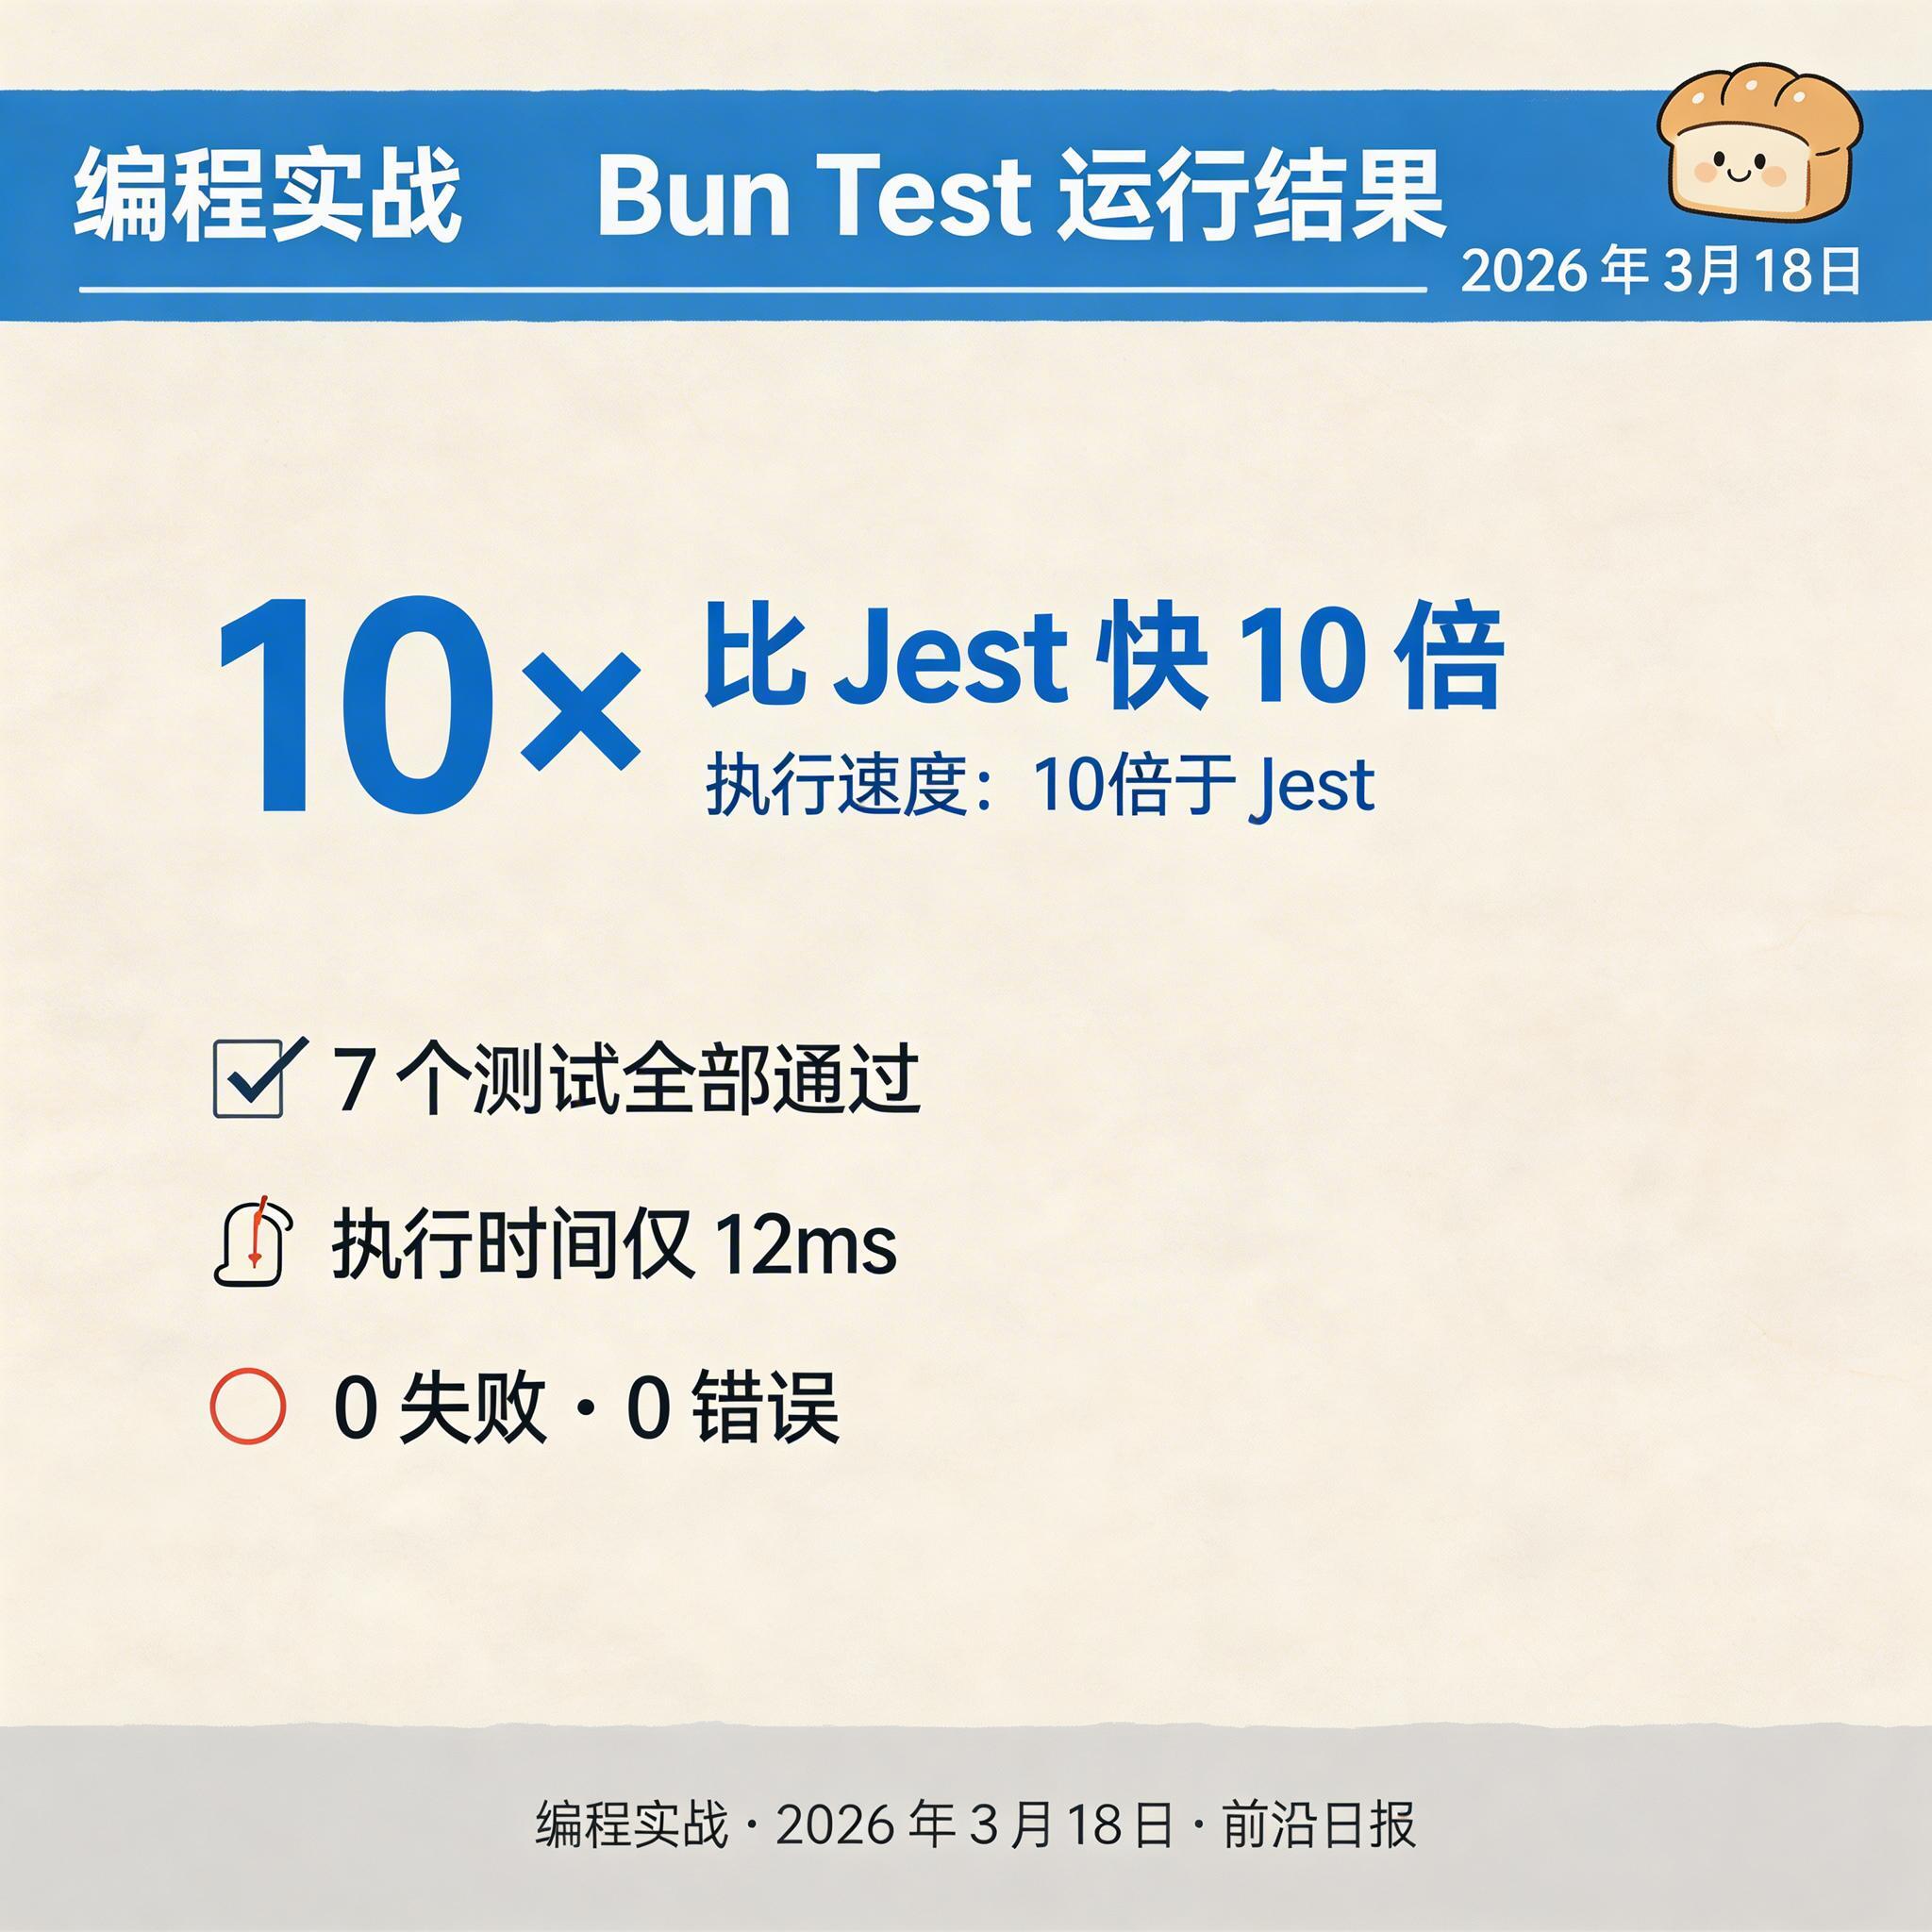
快照测试入门
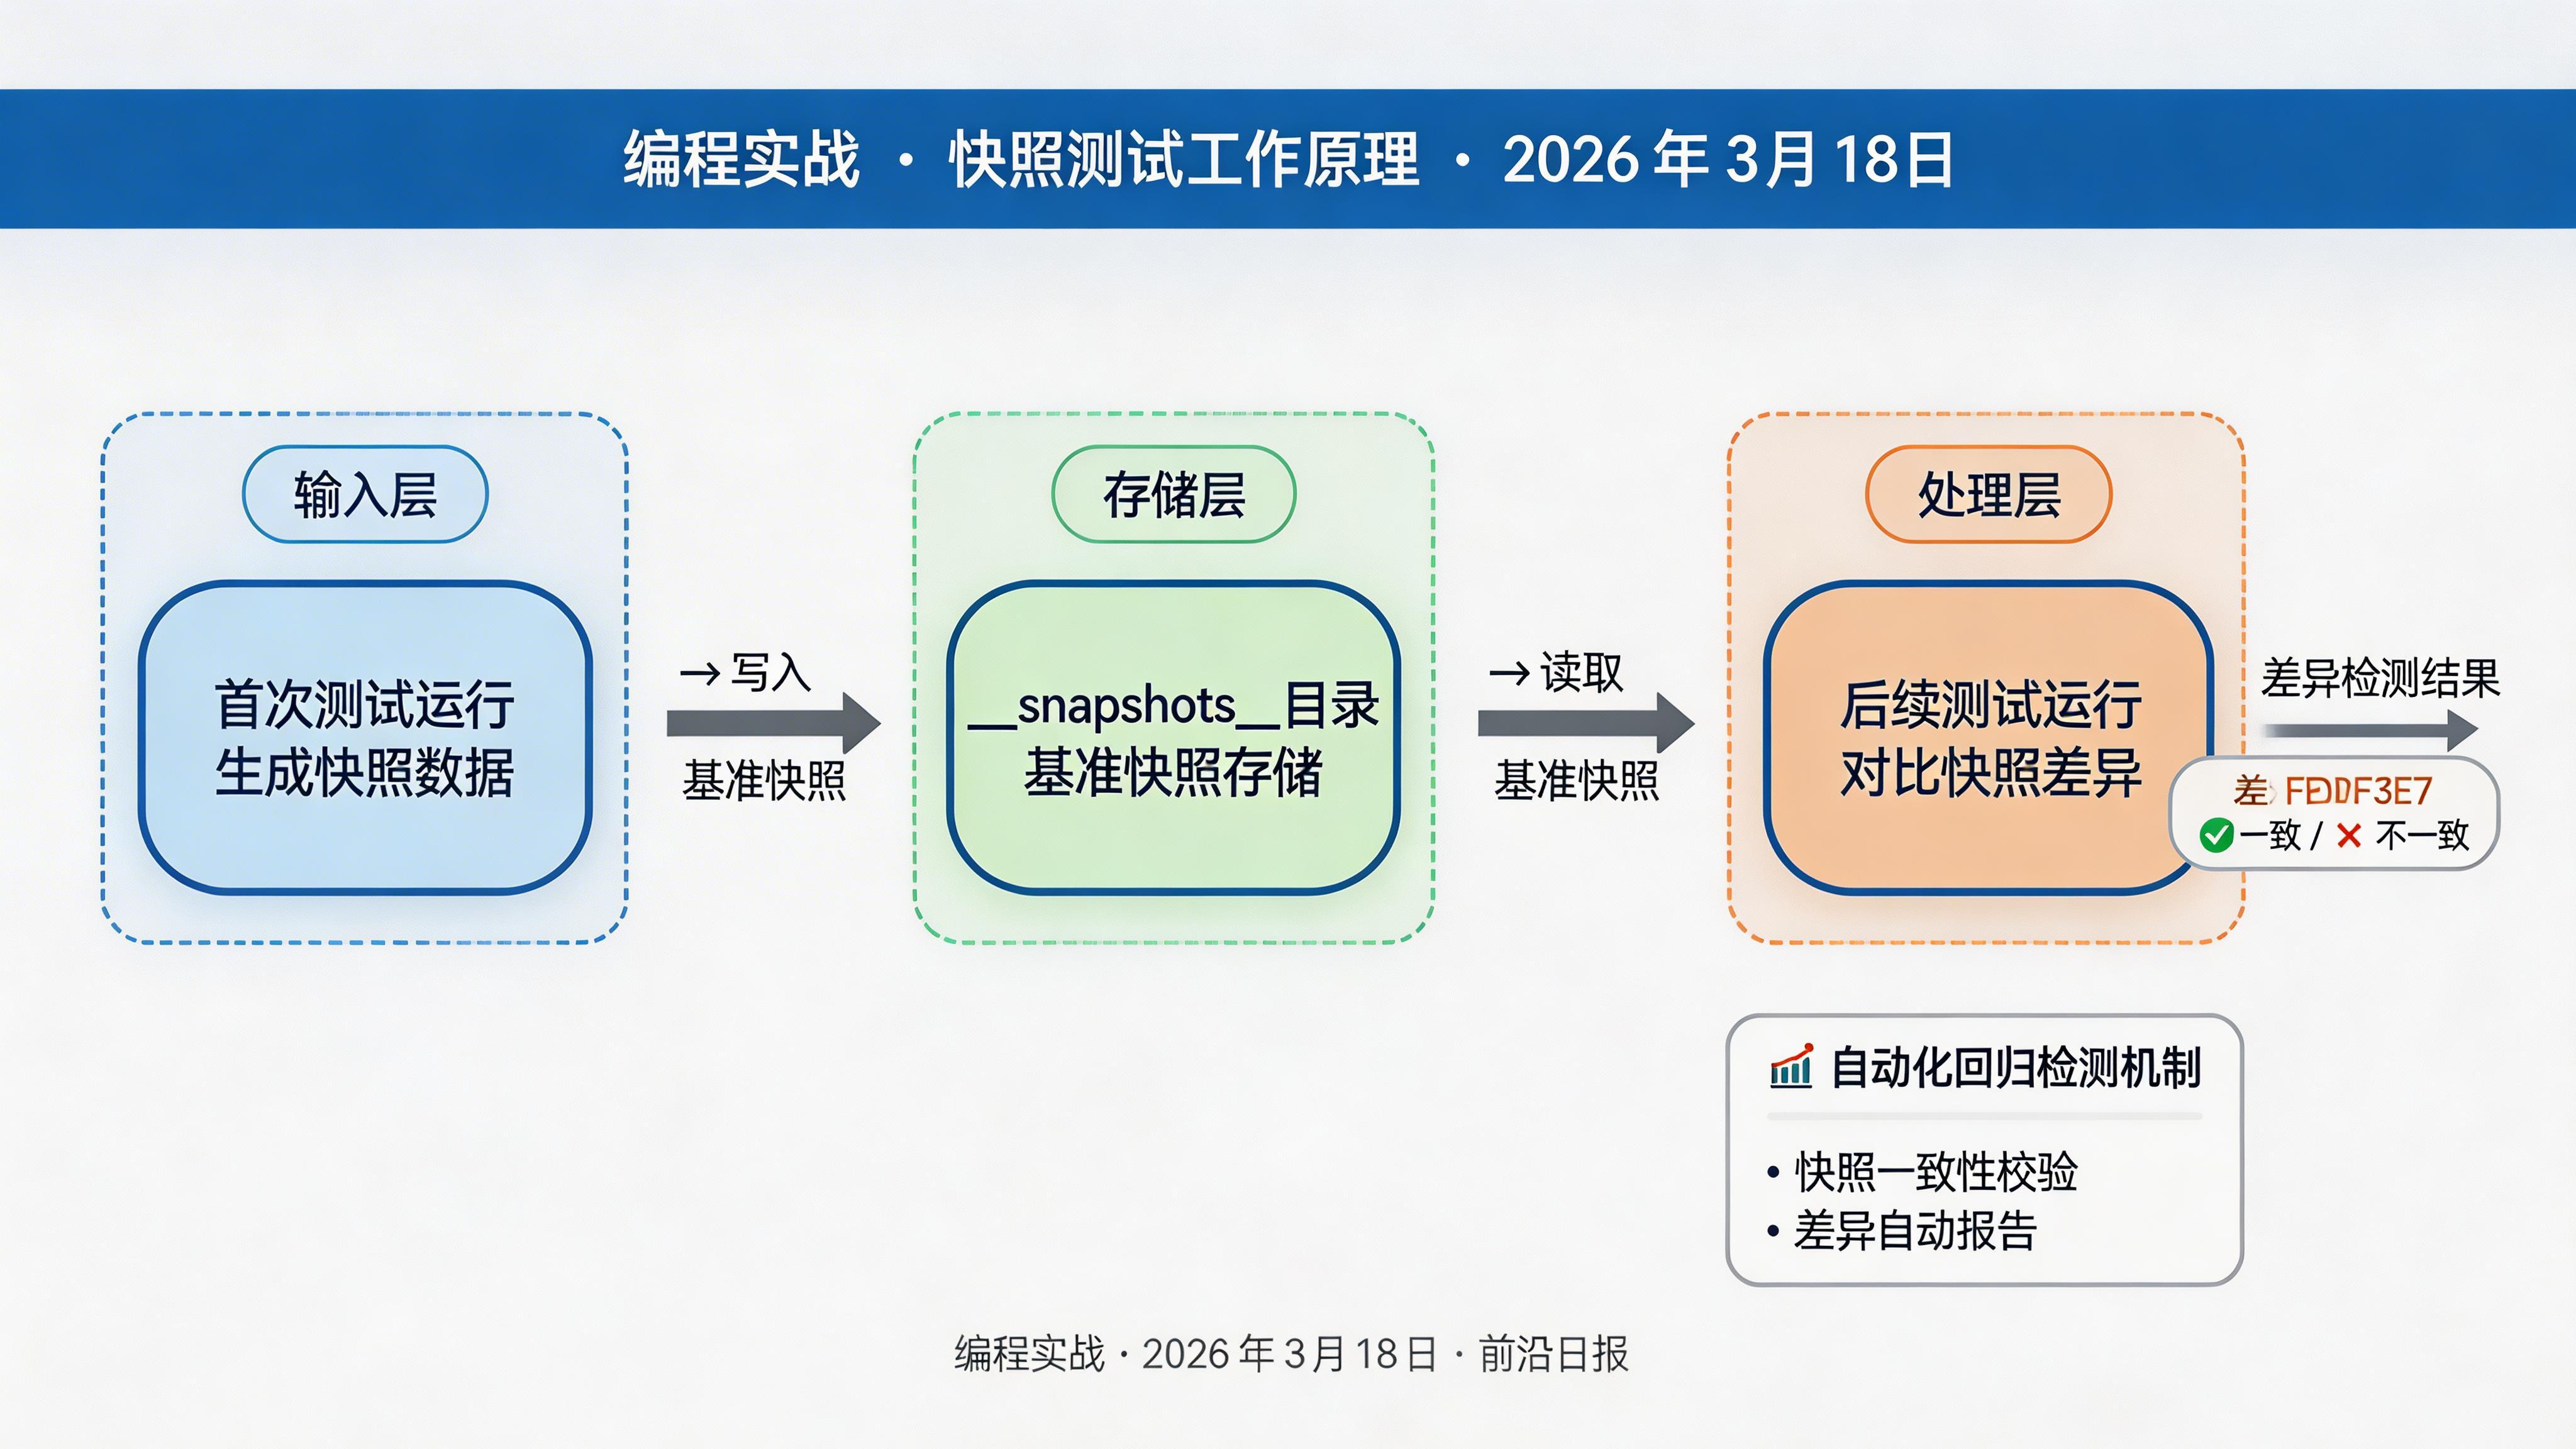
快照测试用于验证复杂数据结构或序列化输出是否意外改变。创建 src/utils/formatter.test.ts:
// src/utils/formatter.test.ts
import { expect, test, describe } from "bun:test";
import { formatUser, formatAPIResponse } from "./formatter";

describe("格式化器快照测试", () => {
  test("用户对象格式化", () => {
    const user = {
      id: 1,
      name: "张三",
      email: "zhangsan@example.com",
      createdAt: new Date("2026-01-01"),
    };
    expect(formatUser(user)).toMatchSnapshot();
  });

  test("API 响应格式化", () => {
    const response = {
      success: true,
      data: {
        users: [
          { id: 1, name: "User 1" },
          { id: 2, name: "User 2" },
        ],
        total: 2,
        page: 1,
      },
      timestamp: Date.now(),
    };
    expect(formatAPIResponse(response)).toMatchSnapshot();
  });
});
对应的格式化函数 src/utils/formatter.ts:
// src/utils/formatter.ts

export function formatUser(user: {
  id: number;
  name: string;
  email: string;
  createdAt: Date;
}): string {
  return `[${user.id}] ${user.name} <${user.email}> (${user.createdAt.toISOString().split("T")[0]})`;
}

export function formatAPIResponse(response: {
  success: boolean;
  data: unknown;
  timestamp: number;
}): string {
  const date = new Date(response.timestamp).toISOString();
  const dataStr = JSON.stringify(response.data, null, 2);
  return `Status: ${response.success ? "OK" : "ERROR"}\nTimestamp: ${date}\nData:\n${dataStr}`;
}运行并生成快照
首次运行测试时,Bun 会自动创建快照文件:
bun test src/utils/formatter.test.ts快照文件会自动保存在 __snapshots__ 目录:
src/utils/
├── formatter.ts
├── formatter.test.ts
└── __snapshots__/
    └── formatter.test.ts.snap
快照文件内容示例:
// __snapshots__/formatter.test.ts.snap
exports[`格式化器快照测试 > 用户对象格式化 1`] = `
"[1] 张三  (2026-01-01)"
`;

exports[`格式化器快照测试 > API 响应格式化 1`] = `
"Status: OK
Timestamp: 2026-03-18T02:30:00.000Z
Data:
{
  "success": true,
  "data": {
    "users": [
      { "id": 1, "name": "User 1" },
      { "id": 2, "name": "User 2" }
    ],
    "total": 2,
    "page": 1
  }
}"
`; 
快照测试的高级用法
内联快照(Inline Snapshot)
适用于需要精确控制的场景:
test("复杂对象的内联快照", () => {
  const result = processUserData({ id: 1, name: "Test" });
  expect(result).toMatchInlineSnapshot(`
    {
      "formatted": "[1] Test",
      "id": 1,
      "processed": true,
    }
  `);
});
自定义快照名称
test("带名称的快照", () => {
  const config = { theme: "dark", lang: "zh-CN" };
  expect(config).toMatchSnapshot("主题配置快照");
});
属性快照
只测试对象的特定属性:
test("只快照特定属性", () => {
  const user = getUserWithMetadata(1);
  expect({
    id: user.id,
    name: user.name,
    roles: user.roles,
  }).toMatchSnapshot();
});
管理快照
Bun Test 提供多种快照管理方式:
# 更新所有快照(接受所有变更)
bun test -u

# 更新特定文件的快照
bun test -u src/utils/formatter.test.ts

# 运行测试并检查快照
bun test --snapshot- 快照变更应代码审查,不要盲目使用
-u更新 - 快照文件应提交到 Git,确保团队一致性
- 定期清理不再使用的快照
常见问题与解决方案
如何让测试文件不参与生产构建?
在 tsconfig.json 中排除测试文件:
{
  "compilerOptions": { ... },
  "exclude": ["**/*.test.ts", "**/__snapshots__/**"]
}
如何测试异步函数?
Bun Test 原生支持 async/await:
test("异步函数测试", async () => {
  const result = await fetchUserData(1);
  expect(result.id).toBe(1);
});
快照测试失败怎么办?
快照失败说明输出有变化。检查代码变更:
- 如果是预期内的变更,用
bun test -u更新快照 - 如果是 bug 引入的,修复代码后再次运行
如何在 CI 中运行测试?
GitHub Actions 配置示例:
jobs:
  test:
    runs-on: ubuntu-latest
    steps:
      - uses: actions/checkout@v4
      - uses: oven-sh/setup-bun@v2
      - run: bun install
      - run: bun test --coverage
进阶技巧
Mock 和 Spy
Bun Test 提供强大的 Mock 功能:
import { mock, expect, test } from "bun:test";

test("mock 函数", () => {
  const mockFn = mock((x: number) => x * 2);

  expect(mockFn(5)).toBe(10);
  expect(mockFn).toHaveBeenCalled();
  expect(mockFn).toHaveBeenCalledWith(5);
});

test("spy 对象方法", () => {
  const obj = { getValue: () => 42 };
  const spy = mock.method(obj, "getValue", mock.returns(100));

  expect(obj.getValue()).toBe(100);
  expect(spy).toHaveBeenCalled();
});生命周期钩子
使用 beforeEach 和 afterEach 进行设置和清理:
import { describe, expect, test, beforeEach, afterEach } from "bun:test";

describe("有状态测试", () => {
  let counter: number;
  let tempFile: string;

  beforeEach(() => {
    counter = 0;
    tempFile = Bun.temp("test");
  });

  afterEach(() => {
    Bun.unlinkSync(tempFile);
  });

  test("计数器初始为 0", () => {
    expect(counter).toBe(0);
  });
});
总结
- Bun Test 零配置,原生支持 TypeScript,开箱即用
- 快照测试自动检测输出变化,防止意外回归
bun test命令运行所有测试,-u参数更新快照- 支持 Mock、Spy、生命周期钩子等高级功能
- 比 Jest 快 10-100 倍,大幅提升开发效率
尝试将现有项目的测试迁移到 Bun Test,或者在新项目中直接使用。体验零配置的测试带来的开发效率提升!